Thursday, January 29, 2015

Maverick Blocks

 The piecing obsession continues! I took out the Farmer's Engineer's Wife project yesterday. In 24 hours, I had 20 more blocks done. Here are blocks #61-80.


The stack is growing and the end is in sight!
 

I had 9 new blocks finished last night that I posted to Instagram. My friend Anita Grossman Solomon commented on my maverick block. I thought Maverick was an alternate name for this block. It actually is a term used by quilt dealers and historians to refer to a block with a mistake in it. Anita was too kind to come right out and say I had screwed up! But as soon as she drew attention to the block in question, I saw the mistake. 
 

It was a quick fix as the last row had been sewn on upside down. 


The errors continued today when I trimmed this block totally the wrong way. 


I started over, trimmed the right way, and all is well.
 

I've got ten more blocks ready to be stitched up tomorrow. I should make it to the magical block #111 in a few days!

Wednesday, January 28, 2015

Strawberry Lemonade

 Here's another blizzard finish. The combination of pink and yellow makes me think of strawberry lemonade. And don't we need a little splash of summer about now?


My friend Ellie pieced this beauty and passed it on to me in November. I'm not sure why she didn't want to finish it. The colors and assortment of fabrics are so lovely. I think we'll donate it to our guild's auction in October.
 

I really enjoyed quilting this! Why is it easier to finish someone else's UFO? One continuous line of quilting means no threads to bury. And no marking is required with this design. Win-win!
 

I found an assortment of peach fabrics in my stash that I thought worked well for the backing and binding. I dug back to the 90's for that binding fabric! It is quilted with a yellow Superior So Fine thread. I love the texture of the quilting on the back. This quilt could be a large table runner, or one corner could be tacked down for a cool vertical wall hanging.
 

Strawberry Lemonade
By Ellie Coffey and Tina Craig
2014-2015
24" X 60"

Tuesday, January 27, 2015

Blizzard Blues

For us quilters, a blizzard means we get to stay home and sew! I finished this piece this morning while switching between local news and the weather channel. We were spared the worst of the storm, but there's a decent amount of snow here in southern RI.

Anyway, here is the newly named Blizzard Blues. I would take pictures outside, but it's still too windy.


I might have mentioned here and on Instagram that I found this basket when I was cleaning up after Christmas. My note cracks me up! I stink at mystery quilts, and this is as far as I got with Bonnie Hunter's 2011 mystery Orca Bay.


 I had so much fun playing with these bits and pieces.


I enjoyed quilting this one, too. I did lots of stitching-in-the-ditches which is just tedious. Then I tried a new fill in the squares. Really not perfect, but I like it.
 

The triple swaggy thing in the setting triangles is kind of cool. Three passes (forward, back, forward) meant I could move right from one to the next without stopping.


The circles in the blue border were challenging and not well-executed. They look OK in this pic, but let's not get too close, OK? That combination of straight and serpentine stitches in the outer border will be repeated again someday, maybe in a different combination or spacing.
 

I didn't have a big enough piece of blue for the back, so I added a strip of red at the top and for the sleeve.
 

And there we have it. All from stash with scrappy binding, batting pieced from scraps. This puppy will benefit from blocking. The right side is a little wavy.


Blizzard Blues
Started January 9, 2015
Completed January 27, 2015 during Winter Storm Juno aka Blizzard of '15
40" square

Sunday, January 25, 2015

Friendship Stars

 My friendship star top came together over the course of Friday night and all day Saturday. I'm really excited about how scrappy it looks. 

The blocks came from swaps in two guilds. Ninigret Quilters swapped blocks last January, February and March which gave me 36 blocks. This January, it was my turn to receive blocks from my RIMQG hive, so I added 10 more blocks to the stash. I made a couple extra for a grand total of 48.


I started a Pinterest board for layout ideas. I liked the idea of creating a secondary design. I played around on EQ7 and the tiny stars in the sashing popped out. The blocks finish at 9", so I cut the sashing strips and corner squares at 2". I think the proportions work well. The top is about 65" X 86".


I pieced together a pile of leftover binding pieces, but I still haven't made a dent in that box-o-binding. It's a good thing I picked up some batting on sale at JoAnn's last week. It looks like we'll be snowed in on Tuesday- a perfect day for quilting, as long as the power stays on.

Friday, January 23, 2015

Scnitzel and Boo Swap- round 3

 Mini quilt swaps are so much fun! This is my second time swapping with schnitzel and boo. This time, it was all based in instagram. I love the concept of #makeaquiltmakeafriend. Since it is a blind swap, you actually get to make two new friends!

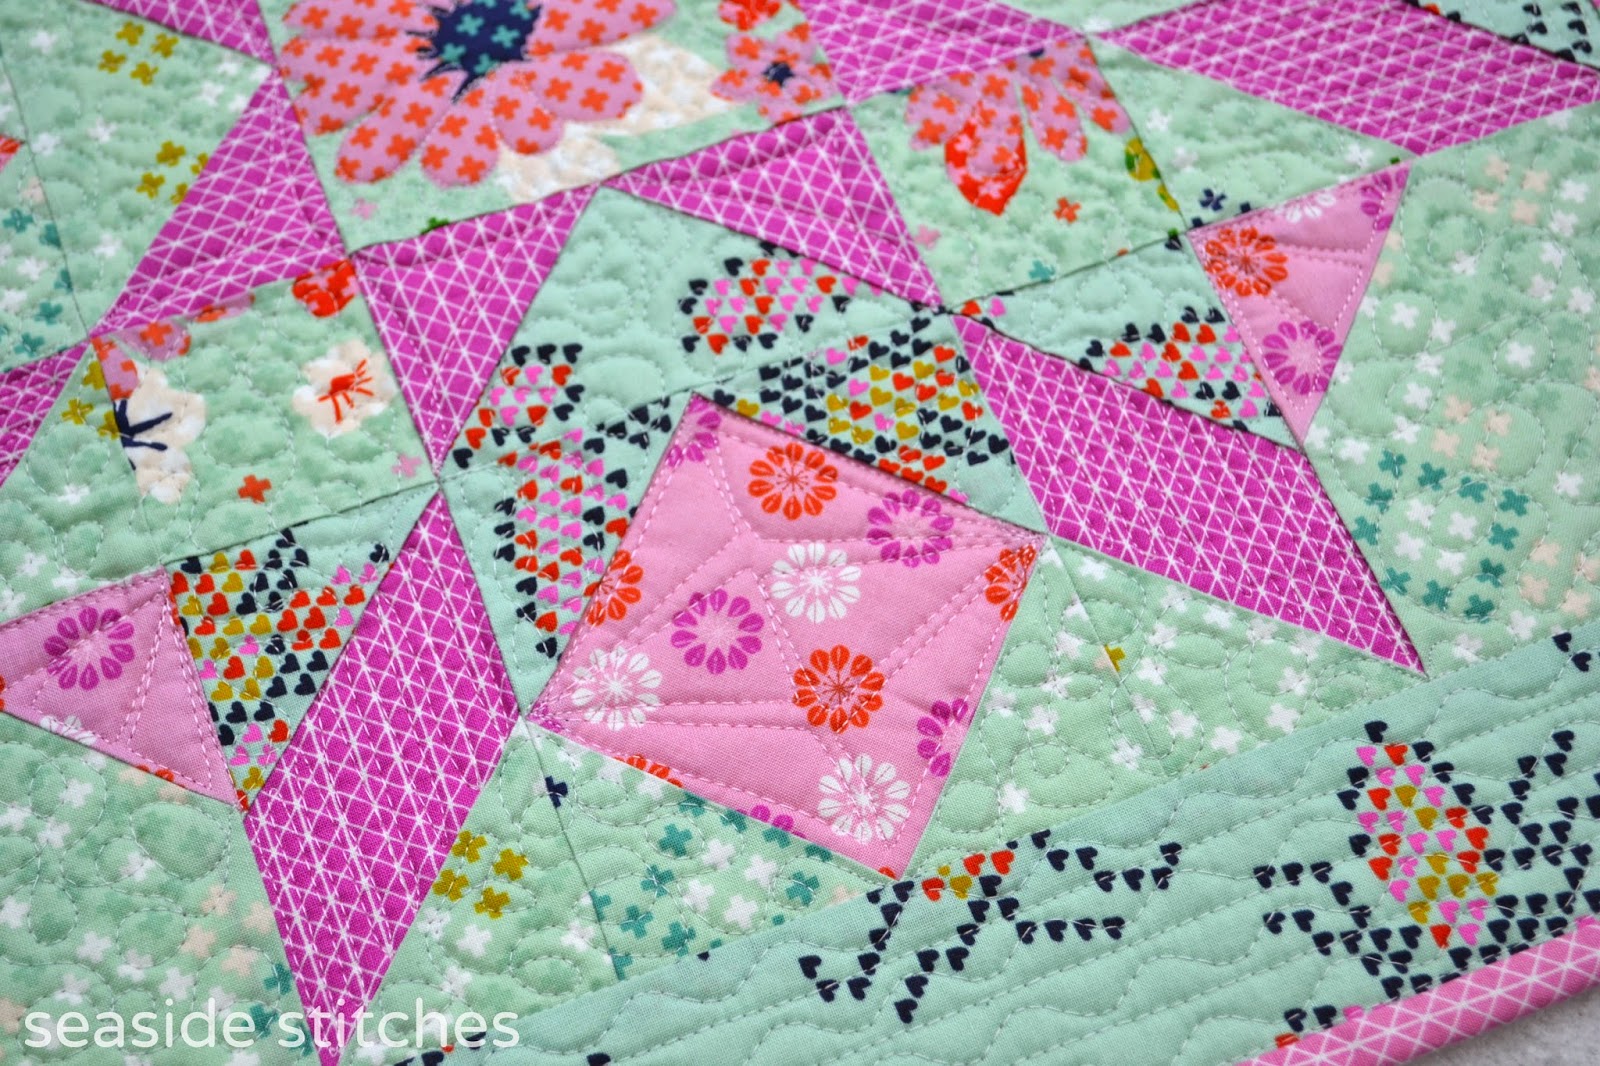
Here's the quilt that I'm putting in the mail today. I hope it is vague enough to tell you that my partner likes cotton & steel fabric. It's a good thing I bought a pile of fat quarters of c&s last fall. Since I couldn't figure out her color preference, I used what I had and made it work. The aqua background was a stretch for me. Oh, how I wanted to use some Kona snow!


The block pattern is from a V & Co pattern called Flower Box. I made a 16" block. With the border and after quilting, the mini is 20" square.


I didn't take many process pics. I wanted you to see the backing fabric. I used what I had, even though it doesn't really go with the front. I like spray basting minis, but I'm too cheap to use it on larger quilts. I spray on my kitchen table because it is easy to clean up if I do it right away. I leaned my cutting board against my machine to protect it.


I posted this pic to instagram when I picked out thread. I used the two that blended the best. The soft, shiny pink is Sulky 40 wt rayon. I'll be using more of this pretty thread. The Aurifil 50 wt cotton is #2600 dove grey that is just a bit blue. Just to illustrate that the numbering system for threads is not uniform, the Sulky 40 wt feels thinner than the Aurifil 50 wt, even though higher numbers usually mean thinner thread. The Sulky is way thinner than a YLI 40 wt quilting cotton. The more you know...


I had fun with the filler free motion quilting. In the border, I did some parallel straight lines then went back and quilted the serpentine lines in between. I think it's a cool look for a small border.


Of course, I had to add some goodies including some local chocolate.
 

So that's my second mini finish of 2015. Maybe I should finish something larger!
 
I received the most perfect mini quilt from Tiffany @loisanddot. She admitted to stalking my sites and it totally paid off! She nailed it. I am totally in love with this mini!


She did some cool concentric square straight line quilting around that feature square.


Look at the print on the back! It made me squeal when I unwrapped the package.
 

The extra goodies are as great as the quilt! Matching magnets and tea wallet, some Kate Spain Horizon, and a magnetic needle minder that I put to use immediately! I had never seen those Lindt chocolate sticks before, but now I'm seeing them everywhere.


I'm not sure if it will hang in the hallway gallery...
 

or the kitchen. Hmm. It might look better on the yellow wall.


 Thank you, Tiffany! It's perfect!!

Tuesday, January 20, 2015

Baby Bricks I


Another UFO to add to the pile. I can't stop piecing lately. I'm actually digging in my bins to look for stuff to piece. Feeding two pieces of fabric under the presser foot is my happy place.

I don't know what this pattern is called or where I saw it (online or in person). It looks a little bit like a zipper, but that's a different pattern. If you know who designed this, please let me know.


It is really simple to piece. You just need bricks and squares. My bricks are 2" X 3.5" so the squares are 3.5".


This project goes a lot faster if you already have a pile of bricks. Several years ago, I chopped up my novelty stash into bricks, squares, and strips.


When you clean up, if you find two more piles of bricks that fell onto the chair, you'll just have to piece another quilt!


What will Tina piece today?

Monday, January 19, 2015

Random Stitching

There's been a whole lotta random going on around here. I'm really enjoying these small projects.

Beth at EvaPaige Designs is collecting blocks for her new pattern. (Learn more about it here.) This is the block in all solids that I made for Beth to keep.


Three of these blocks will be swapped, and I couldn't resist making extras for myself.


Since there were stitch and flip corners on these blocks, I had a pile of tiny triangles, begging to be sewn together.  Funny story- a Girl Scout friend stopped by last week and we went through my bin of GS fabrics for her troop's t-shirt quilt. She asked me about the small pieces and wondered how small a piece would I save. I showed her this pile of triangles that I just couldn't throw away. The colors were too pretty!  The HSTs in this mug mat finished at just over 1". The whole mat is 7" X 8".


Digging around my stash, I found a bag of hourglass blocks that Julia had made. The polka dots are fun, but we really had no use for the blocks or the wallhanging they were planned for. I started playing with them and suddenly remembered that there is a local quilting bee collecting placemats for Meals on Wheels. It was fun mixing up the parts into these three designs. I quilted them on Saturday night after seeing American Sniper. I needed to spend some time in my happy place! The colorful striped binding was in my scrap binding bin.


I've been playing with these Orca Bay parts for a couple of weeks. I used almost everything I had left to make three more placemats. Making placemats is my new favorite thing to do!


We could call all this random stitching procrasti-quilting. I really need to quilt my schnitzel and boo swap piece. Maybe I'll gather the courage today. I'm hesitating because my swap partner has a long arm and does some really beautiful work. I can't compare with that on my Bernina, so I just need to let it go and do my thing.

Monday, January 12, 2015

Empty Nest Quilting

 Our nest is empty again. Bill and I helped Julia move into a new dorm room yesterday. There are perks to being an upperclassman, and she loves her larger room with private bath.

I've got a lot of projects to keep me busy. Last week was all about piecing. I love piecing! I love the process of cutting up fabric and sewing it back together. If the process involves some clever recutting and resewing, that makes me even happier!

Two examples from my recent sewing sessions:
Anita's Arrowheads for the back of my jelly roll quilt...


This is my new stash project. As I come across smaller pieces of fabric, I'll be cutting 8.5" squares for this project.


 I pulled out this Philip Jacobs' geranium print for my New Year post. I couldn't resist getting right to work on this One Block Wonder. I'm sure I bought the book, but I couldn't find it anywhere. I had to wing it! It was a blast cutting and piecing this top. Now I need to figure out what to use on the back.


 I'll be focusing on quilting this week, starting with this mini for the schnitzel and boo swap. I'll tell you more about it when it is done.


 When I cleaned out my storage area, I found a basket full of Orca Bay parts from 2011. There were lots of HSTs and hourglass blocks. As I was piecing other projects, I pieced together pinwheels from the HSTs as leaders/enders. In no time, I had a new project to assemble. I put the last 2 borders on this morning making this a 40" square wall hanging. Now this needs backing fabric, too.


 And one more to quilt. My friend Ellie was working on this table runner and lost interest. I'll quilt it up and donate it to our guild auction in October.


 Let's sum up...
Ready for quilting:
Jelly roll/Arrowhead
One block wonder
schnitzel and boo mini
Scrappy blues
pink/yellow runner

Wednesday, January 7, 2015

Setting In Circles

 Last weekend, Julia and I worked on our retreat projects from last March. During the retreat, we made the jelly roll race tops. Pat Harrison's design had a lovely swirl of circles that were set in using Sharon Schamber's piece-lique method. Julia and I thought we could arrange our circles so the quilts would work together. I first thought of a yin-yang type deisgn. The heart was Julia's brilliant idea.


The original method requires cutting holes in the background first, then piecing in the circle. We reversed that and prepared the circles first by pressing under the seam allowance. Then we glue basted them to the background and cut away the inside of the circle from the background. Finally, we machine stitched the seam. If you've done any piece-lique, this might make sense. It's hard to describe, but it worked for us. Anyway, don't our finished tops look cool together?


When I went to my stash to look for a backing, I found my bin full of Anita's Arrowhead blocks and batik squares waiting to be pieced. About a year ago, I cut up my entire batik stash into squares for these blocks. I pulled all the yellow, orange, pink and green and went to town piecing blocks. I absolutely love making these blocks! Anita's process makes me happy! Now I have a pieced backing that will make this a two-sided quilt.


The binding is pieced from scraps leftover from my circles.


My top, backing, and binding are ready and waiting for me to buy some batting.


I set aside all the blues for Julia, but she won't be able to work on hers again until Spring break.