Showing posts with label tutorial. Show all posts

Monday, November 9, 2020

Facing EPP Quilt with EPP

Let's say you've pieced together a top using English Paper Piecing and you have all these angular shapes around the edges. How will you finish those edges? You could certainly trim them and use a straight binding. Or you could create a facing with more EPP shapes! Here's how...

1. Press your top well, especially around the edges. Remove all of the papers.


2. Quilt as desired. Don't stitch into the seam allowances around the outside edges.


3. Trim away the batting and backing a little bit smaller than the finished edge.


4. Create a ring of EPP shapes that mirrors the quilt top. That's your facing.

 
5. Place the facing right sides together with the quilt top.
 
 
6. Whipstitch all the way around the outside edges.


 7. Remove the papers from the facing.


8. Pull the quilt top through the hole in the middle of the facing and flip the facing to the back side. Carefully poke out the corners and smooth the batting and backing into the corners and along the edges.
 
 
9. Stitch down the inside edges of the facing to the back of the quilt.
 

10. Done!


I used this method to finish my "Our Lady" quilt. I had purchased a panel with four images of Our Lady of Guadalupe. Inspired by Brigitte Giblin's work, I framed each of the images with fussy cut EPP roses. I didn't want to chop off the edges, so I used an EPP facing.


For other options for finishing EPP, please refer to Geta's post.

Friday, May 1, 2015

Free Motion Embroidery on a Featherweight

Happy May Day!

I want to share with you my process for embroidering the eyes on my Elephant Parade baby quilt. In the quilt along pattern by Sew Fresh Quilts, Lorna suggests embroidering the eyes on the elephants and other animals. I had pieced the blocks on my Featherweight, so I decided to try some free motion embroidery. (I was too lazy to set up the Bernina for a zigzag!) It worked out pretty well. Here's how I did it...


1. Cut a small square of interfacing or stabilizer and press to the back of the block. (Not pictured here, but you'll see it later.)

2. Draw a circle with a Frixion pen or marking tool of your choice. You will be hitting it with an iron later, so keep that in mind when choosing your marking tool.

3. Set the stitch length to a high number so it makes tiny stitches. Pull up the bobbin thread to the top so it doesn't make a knotted mess on the back. You can't drop the feed dogs, so just start stitching. Push the block around under the needle, making the circle first, then filling in. I used a black quilting thread that I had in my stash. A thicker thread fills in quicker.
After reading some posts about machine quilting on a FW, I would suggest covering the feed dogs with a piece of template plastic or teflon. Cut a small hole for the needle and tape it to the bed of the machine. If you have a darning foot, use it. I don't, so it was hard to see where I was going.

4. All filled in.

5. Thread a needle with the thread tails and bring them to the back.

6. Tie the ends in a knot. Trim ends to about 1/2". (See the interfacing?)

7. To prevent the black tails from shadowing through, I added another bit of interfacing on top to sandwich the threads. This bit of ironing also erased the markings from the Frixion pen.

So there you have it. Let me know if it works for you.

Sunday, November 30, 2014

Quilted Star Ornament Tutorial

 I have a quick tutorial for you today for simple fabric Christmas ornaments.

While I was decorating for Christmas, I decided to make a star garland from my old stash of African prints. The stars were so much fun to make, I thought I'd share the process with you. This is a great way to use up fabric and batting scraps.


 You will need some fabric scraps, batting scraps, ribbon for hanging or stringing, glue dots (or hot glue), shapes cut from freezer paper, pinking shears and a sewing machine.


I cut some 4" stars out of freezer paper using my Sizzix machine.  You can make any shape in any size. Press your freezer paper shapes onto a fabric scrap, leaving at least 1/2" between shapes.


Layer a piece of fabric (right side down), then some batting, and the fabric with shapes on top. Pin the layers together.

Using a slightly longer stitch length than normal, stitch around each shape, close to the edge of the freezer paper. (I'm working on the Featherweight because I dropped off the Bernina for service. Vacations are the perfect time to bring machines in for service!)

Overlap your beginning and ending stitches about 1" to lock the stitches, as indicated by the arrows below.

Clip the threads. Cut out the shape with pinking shears, about 1/8 - 1/4" away from the stitching line. I found it easier to see where to cut with the freezer paper still attached. 


Once the shape is cut out, remove the freezer paper.

Aren't they fun? I'm thinking about sewing together the bits and pieces to make scrappy stars.

I was trying to decide how to attach the stars to the ribbon and remembered I have lots of glue dots in my stash leftover from scrapbooking and Girl Scouts. 


The larger dots were perfect for the garland. You can just barely see it through the sheer ribbon at the top of the star.


I used two tiny dots to attach a ribbon for hanging an ornament.

If you don't have any glue dots handy, you can stitch or hot glue the ribbons. If you don't have pinking shears or a pinking blade for your rotary cutter, a straight cut will work just fine.


I'm still tweaking my Africa-theme Christmas mantle. The bows on the carved animals are causing some controversy in the family! Bill spent a year in Liberia when he was a kid. He bought the animals and his parents brought back the wall art made from barbed wire. 


You might not hear from me again for a couple of weeks. Bill and I are leaving soon to meet Julia in Tanzania. I suspect there will be more animals to add to the mantle, and there will certainly be lots of fabric to add to the stash! (Be on the lookout for a fabric giveaway before Christmas!) If I find a decent internet connection, I'll try to blog while we are away.

Baadai! 
(See you later)


Added 12/3/14: When I decorated the tree last night, I found this cute selvedge star. Apparently, I've made these stars before! This one is actually dated 2008. It was made in a quilt as you go style, stitching together the selvedges and quilting through the batting and backing all at once. If that makes no sense, I can clarify after the trip. I just wanted to show you another option for these ornaments.

Sunday, April 13, 2014

Not Cool

 It was brought to my attention that someone is selling a pattern on Craftsy that very closely resembles my fabric box tutorial. The pattern is being sold for $6. I am not affiliated with the seller in any way.

http://seaside-stitches.blogspot.com/2013/03/fabric-box-tutorial.html

 Even if she has made significant improvements to the instructions, her finished product looks just like mine. It might be perfectly legal for her to rewrite a pattern and sell it, but it's not cool.

http://seaside-stitches.blogspot.com/2013/03/fabric-box-tutorial.html

I have allowed people to use the tutorial at guild workshops and quilting retreats. And if you want to make fabric boxes to sell at boutiques or craft fairs, that's fine with me.

http://seaside-stitches.blogspot.com/2013/03/fabric-box-tutorial.html

But selling a pattern that is available for free is just not cool. I know this kind of thing happens all the time. Thank you to my eagle-eyed anonymous commenter for letting me know about this. 

I don't want to provide a link to the pattern, but if you'd like to compare for yourself, search Craftsy for Treasure Box. I have sent a notice to Craftsy and will let you know when I receive a response.
 
http://seaside-stitches.blogspot.com/2013/03/fabric-box-tutorial.html

If you'd like to see the variety of boxes being made from my FREE tutorial, please visit my Pinterest board. Thank you, quilty friends!

Tuesday, August 13, 2013

How to Sew on Scout Patches

As the mother of a Gold Award recipient and an Eagle Scout, I've sewn hundreds of patches on uniforms, blankets and tote bags.


In fact, I stitched 130 patches onto Pete's blanket last weekend. It was time to get the 2010 Jamboree patches out of that shoebox! This is what I learned...

Any scout mom or grandma knows that most patches are backed with a plastic-like stabilizer that seals in all the embroidery threads. That is not fusible web! It is almost impossible to stitch through by hand, so I use my machine. (There are some new iron-on Girl Scout patches, but I've seen many of them fall off. Add some stitches to be safe.)

 I use a mono-filament invisible thread in the needle and a regular thread in the bobbin that matches the color of whatever I'm adding the patches to. You might need to loosen the top tension if you see too much of the bobbin thread coming up through to the front of the patch.

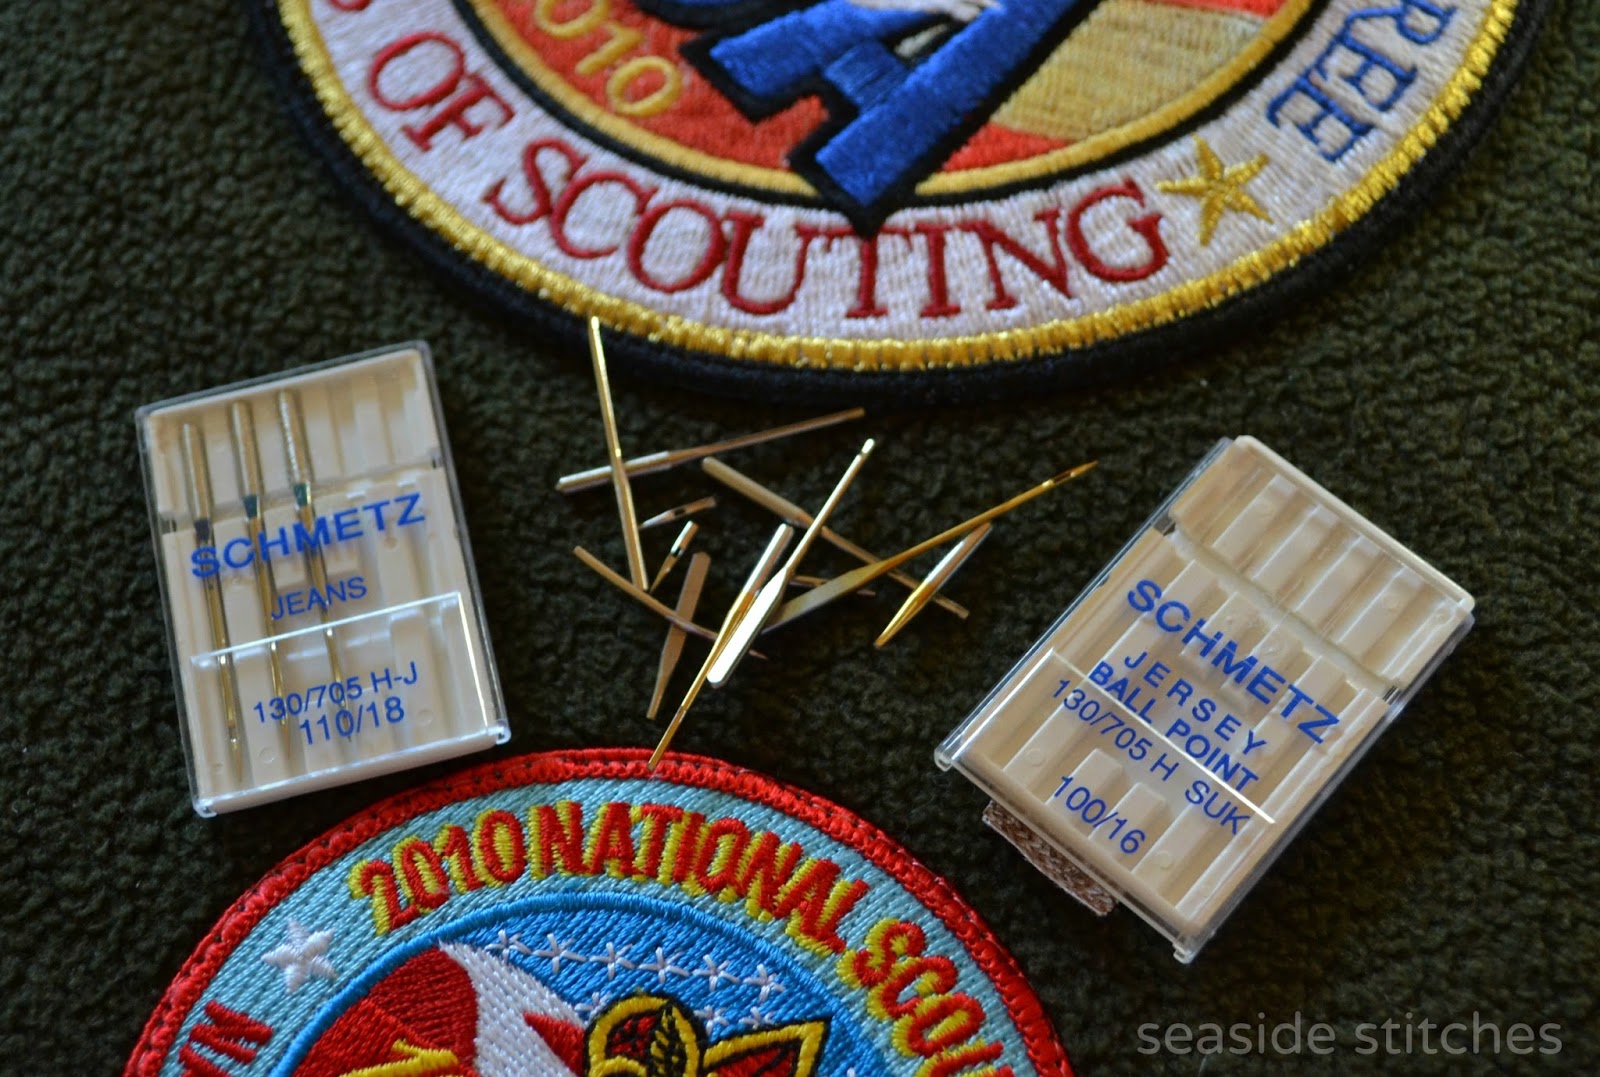
Choosing the right needle is a puzzle! I had Superior 90/14 topstitch needles on hand, but they were not strong enough. I liked the feel of the ballpoint needles on the fleece blanket, but again, the 100/16 needles snapped if I hit something they didn't like. I had the best luck with 110/18 jeans needles. I only broke one of those. It's a good idea to wear glasses or safety goggles to protect your eyes from flying broken needles!

Position the patches and use safety pins to hold them in place. If you can't get the pins through that awful plastic backing, tape them on, removing the tape as you go.

Drop your feed dogs and use your embroidery or free motion quilting presser foot. I bring the bobbin thread to the top so it doesn't make a knotted mess on the back. Start stitching, SLOWLY, around the patch. With the feed dogs dropped, you will need to move the patch/blanket under the needle. This way, you don't have to turn the whole blanket to get around the patch- think hula hoop motion. After you get all the way around, overlap the beginning about an inch before moving to the next patch. Lift the presser foot, slide the blanket over, and start the next patch. I trim all those connecting threads between patches later. If there are two patches abutting each other, you can just keep stitching.

Uniforms are a little easier. (That double layer of polar fleece was not my friend.) By free motion stitching, you can slide the sleeve onto the free arm of the machine and easily stitch around the patches.

In this closeup, you can see that I'm trying to stitch in that ditch where the satin stitching meets the patch fabric. That seems to be the point of least resistance.

I really try to avoid hand stitching, and I have been known to sew pockets shut by machine stitching pocket patches! In this case, I decided it would be nice to do it right, and hand stitched the Eagle Scout badge. That was a tiny pocket, because there is a pen slot on the left side, so it was hard to fit a hand in there to keep the pocket open. If you use something like a credit card or needle case inside the pocket, you can stick the needle in until it hits the plastic, and make your stitch without closing the pocket.

 This is what happens when your son earns a patch at camp and sews it onto his dirty shirt by himself! His friend made fun of him for sewing the pocket shut. Haha!

When you are done, use hair elastics (hair ties, pony tail holders) to keep your thread neatly on the spool. This must have been a Sew Many Ways tip, but I can't find it right now. We'll just give Karen credit for it anyway, because she's awesome!

I hope this helps some scout moms. Enjoy your time in scouting!