Pages

Tuesday, November 24, 2020

Live EPP Class on Zoom!

Have some fabric scraps, needle and thread? Join me for a Live EPP Ornament class next Wednesday! I'll be doing live demos, providing step-by-step instruction and answering your questions throughout the 2 hour class. Beginners are welcome, even if you didn't already know that EPP stands for English Paper Piecing.


You will need to print the templates onto a sheet of cover stock before class starts, so please plan accordingly. (I've heard that not everyone has a printer and a supply of card stock at home.)
 
You do not need to have your own Zoom account to participate.


Send me an email (tinastitches@gmail.com) to let me know you are interested and I'll send you a PayPal invoice for $15. After I receive your payment, I'll email you the supply list, template file and the link to the Zoom meeting.

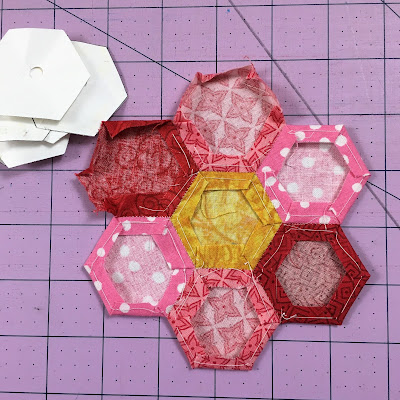
These ornaments make great gifts! Choose some fabric that suits the recipient. The purple one was for my BFF and the blue flamingos was for my son's girlfriend.


Live EPP Ornament Class on Zoom
Wednesday,  December 2, 2020
7-9 pm Eastern (same as New York City)
$15
Class size is limited to 15 students
Instructor: Tina Craig 
Email Tina to register: tinastitches@gmail.com


Hope to see you soon!

Monday, November 9, 2020

Facing EPP Quilt with EPP

Let's say you've pieced together a top using English Paper Piecing and you have all these angular shapes around the edges. How will you finish those edges? You could certainly trim them and use a straight binding. Or you could create a facing with more EPP shapes! Here's how...

1. Press your top well, especially around the edges. Remove all of the papers.


2. Quilt as desired. Don't stitch into the seam allowances around the outside edges.


3. Trim away the batting and backing a little bit smaller than the finished edge.


4. Create a ring of EPP shapes that mirrors the quilt top. That's your facing.

 
5. Place the facing right sides together with the quilt top.
 
 
6. Whipstitch all the way around the outside edges.


 7. Remove the papers from the facing.


8. Pull the quilt top through the hole in the middle of the facing and flip the facing to the back side. Carefully poke out the corners and smooth the batting and backing into the corners and along the edges.
 
 
9. Stitch down the inside edges of the facing to the back of the quilt.
 

10. Done!


I used this method to finish my "Our Lady" quilt. I had purchased a panel with four images of Our Lady of Guadalupe. Inspired by Brigitte Giblin's work, I framed each of the images with fussy cut EPP roses. I didn't want to chop off the edges, so I used an EPP facing.


For other options for finishing EPP, please refer to Geta's post.

Sunday, May 3, 2020

HOPE

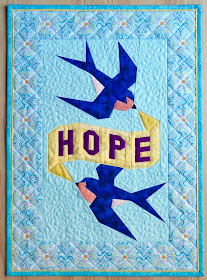
Here's a small quilt I made this week that I absolutely love. The pattern is one block of the Tattoo Quilt by Berene Campbell at Happy Sew Lucky. You can purchase patterns for the whole quilt or individual blocks in her Etsy shop.


I immediately fell in love with this block because the Rhode Island state motto is Hope. And I love tattoo art. And barn swallows are cool.

I downloaded the pattern and started piecing on Tuesday. I thought a scrappy green background would be fun. It. Was. Not. The completed block went in the trash!

Restarted on Wednesday. I wanted to use the same deep blue for the birds, but I wasn't sure if there was enough. I traced the pattern shapes, added generous seam allowances, and cut out the pieces. Joost-a-joost, as my grandmother would say!


My favorite bit of piecing is the life light in the eye.


The quilting texture in the background makes me happy.


My goal with this binding was to match up the flange at the join more accurately than past attempts. Nailed it! I used the tutorial by Sew Fresh Quilts, but made my binding a bit narrower. (I cut my strips 1.25" and 1.5" wide.)


Glamour shot. Julia bought these lunchboxes on a high school trip to NYC. They haven't moved from this spot since!


HOPE
15" X 20.5"
Pattern by Berene Campbell
Started 4/29/2020
Pieced on 4/30-5/1
Quilted and bound 5/3/2020


These are two of the five neighborhood deer that snack in our yard almost every day. I wish they'd stay away from the lilacs!

Friday, March 6, 2020

Frankie's Woodland Friends

Here's another baby quilt I made in 2017, this one for my great nephew, Frankie. I blurred out Frankie's unique middle name for privacy reasons.


Most of the animals are from the pattern Woodland Critters by Shiny Happy World.


I added the turtle (for the book character Franklin) and a cardinal at mom's request.


I don't do machine appliqué often, but I did enjoy the process. I worked on one block at a time, adding to the design wall as I went.


I did not quilt-as-you-go as suggested in the pattern. 


 I love how Wendi's creatures have such character.


Emily's Giraffes

Since I have some free time while I wait for my grandson to be born, I thought I would show you a couple of other baby quilts I never posted. This is Emily's Giraffes, made for my great-niece in 2017.


The pattern is Giraffes in a Row by Lorna at Sew Fresh Quilts. It goes together quite nicely with some careful cutting and accurate 1/4" seams.


 The pink baby giraffe is Emily.


I pieced the other 3 during a weekend retreat. Several friends have since purchased the pattern!


Big sister Jackie is purple, mom is teal and dad is Syracuse orange!


Quilting my standard loopy swirl.


Glue basting the binding to the back allows for tidy machine stitching from the front. It makes me happy. Is that weird?


The backing fabric was purchased years ago when my LQS retired.