Wednesday, February 27, 2013

Wip Wednesday

 It has been a fun, quilty week around here, with an even better week to come. Our annual quilting retreat is this weekend!

Finishes:
OK, so this first finish has very little to do with me. My son came home from a school trip to Nicaragua. His friend took this photo of Pete on top of El Hoyo. They camped overnight on this ridge! Doesn't this look like an ad for an outdoor outfitter?


 I chose the blocks for my month in the Modern Stash Bee and wrote a tutorial about them.


The cutest finish was Olivia's quilt, which was shipped to my newest grand-niece in Denver on Monday.


In Progress:
 While my boys were at The Who concert in Providence last night, I tuned in to Bonnie's QuiltCam and picked up my Sugar Wave quilt. This poor quilt has been sitting idle for too long.


I took a class with Cindy Needham last week and she gave us permission to not be perfect. I kept that in mind as I quilted free-motion circles for the first time. Perfect? Nope. But the overall effect is so cool! I finished half of the gray strips in about 2 hours. I haven't figured out yet what to do with the lava lamp shapes. Any ideas?

This past week, I reached 200 followers (Welcome, new friends!) and blew past my 500th post. I'm getting ready for a giveaway, so please come back soon to enter!

Linking up...
WIP Wednesday at Freshly Pieced

Tuesday, February 26, 2013

Album Block a.k.a. Chimney Sweep Block Tutorial


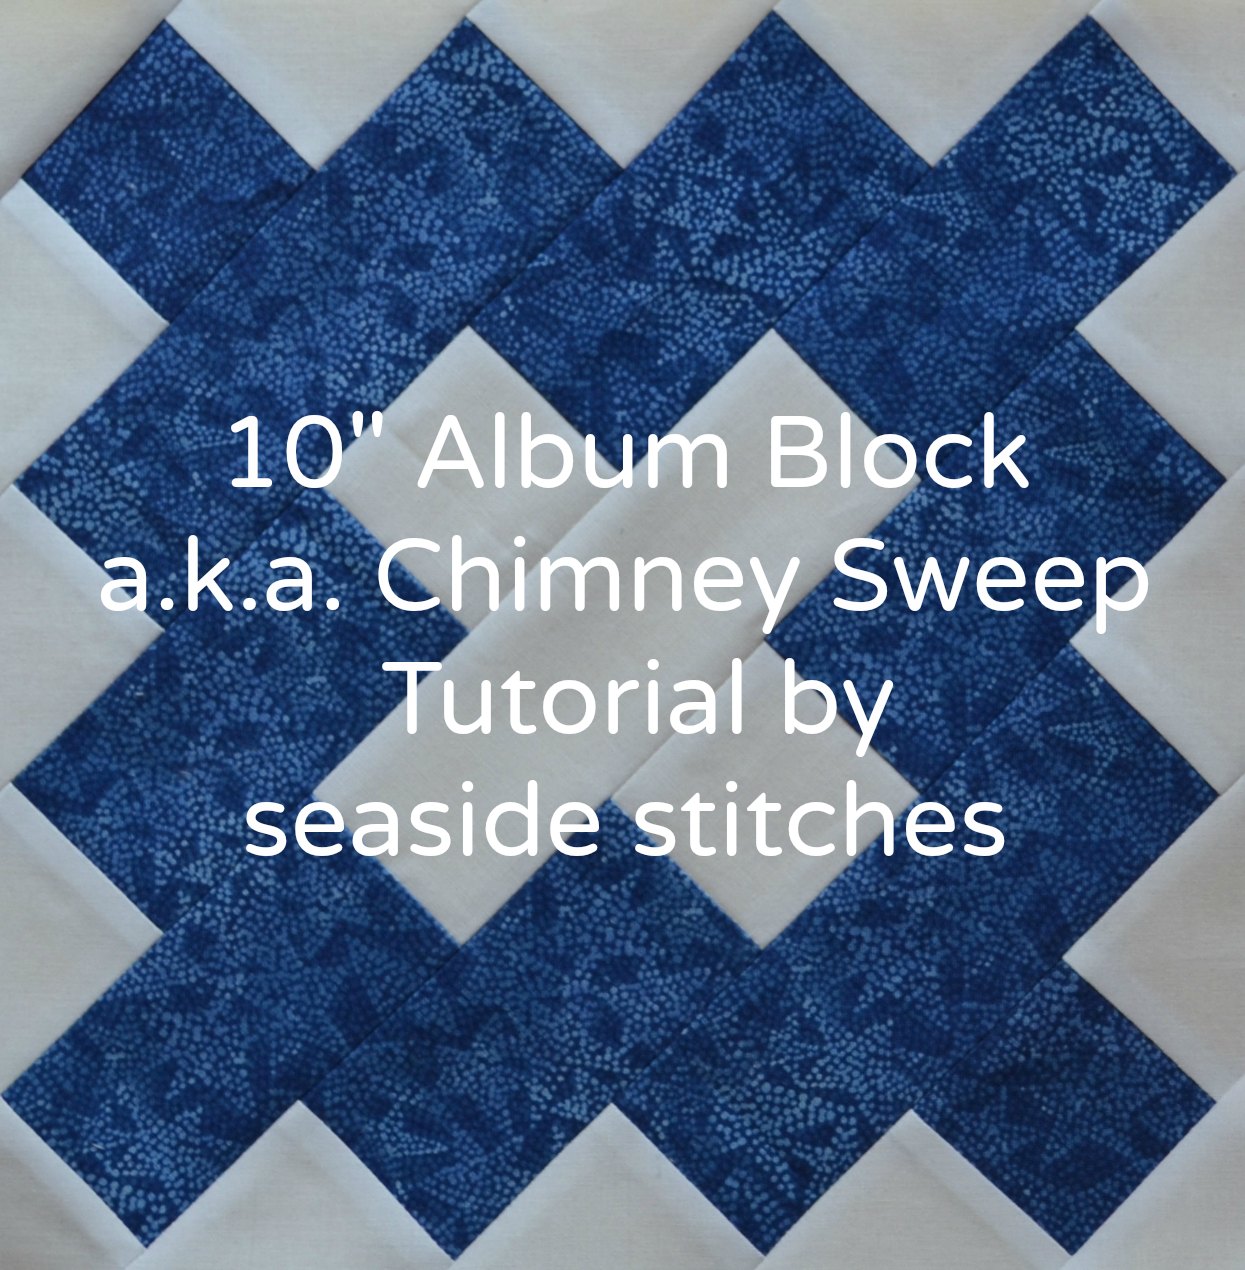
The Chimney Sweep/Album Signature Block is an old favorite. It is a two-color block which is really appealing to me. There is a chimney sweep signature quilt from 1840 in Sue Reich's book Quiltings, Frolicks & Bees, 100 Years of Signature Quilts. Karen and I met Sue at Jackie's show last Fall. I was especially inspired by the wartime signature quilts.

I chose this block for my month in the Modern Stash Bee, so I went searching for a pattern/tutorial to share with my hive mates. There is one that uses paper piecing, one for a 12" block, and one that came really close to what I was looking for, but has some typos. Hmm. Guess I'll have to write my own!

Using the basic information found at Patterns from History, I got started. My cutting instructions allow for larger triangles around the outside edges of the block. I'm not a perfect piecer, so I needed a little extra leeway. 

Cutting Instructions
(Note: Take care to accurately cut the 2-1/4" strips. If desired, you may trim down a jelly roll strip.)

White/background
A: (2) 2-1/2" squares, cut across one diagonal = (4) triangles
B: (3) 4" squares, cut across both diagonals = (12) triangles
C: (1) 2-1/4" X 5-3/4" rectangle
D: (2) 2-1/4" squares

Red
C: (2) 2-1/4" X 5-3/4" rectangles
D:  (2) 2-1/4" squares
E: (6) 2-1/4" X 4" rectangles


 Lay out the pieces as indicated below.


 Start piecing the rows. I started in the bottom right corner.
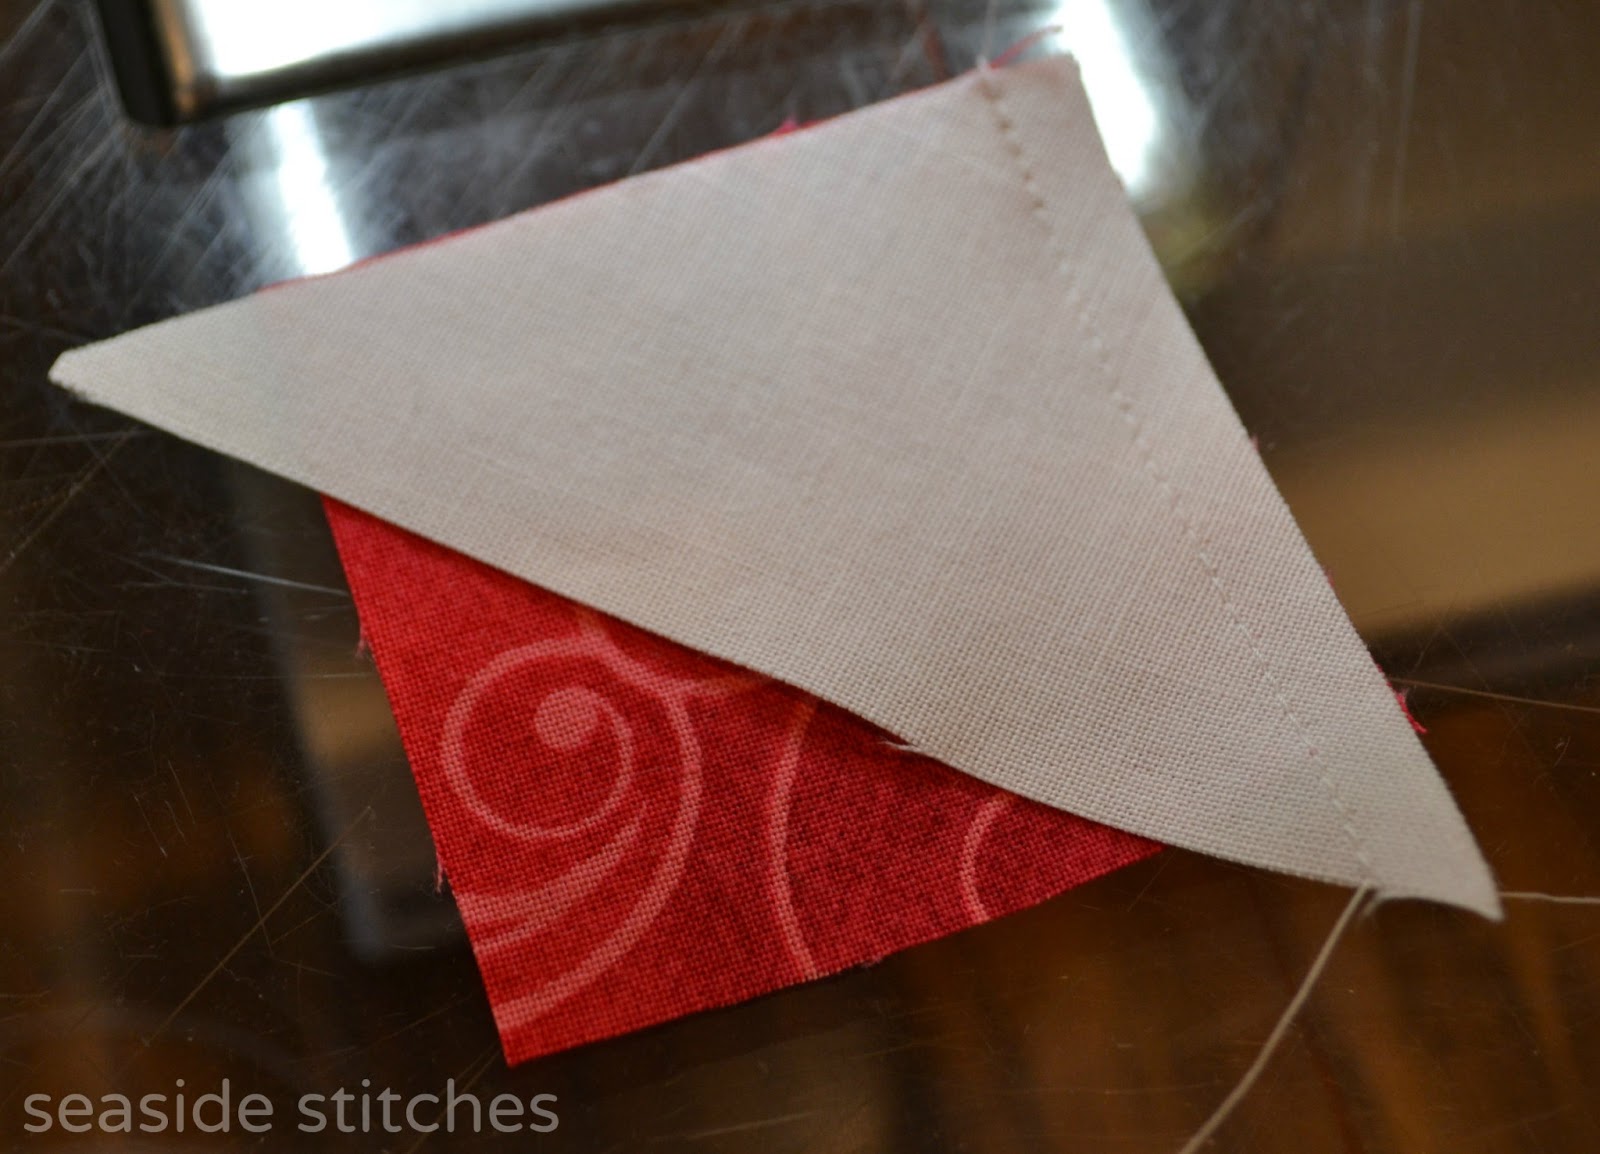
Place a white B triangle on top of a red D square (right sides together if not using a solid), matching one corner. The 45 degree corners of the triangle will be hanging off the square. That's OK. That's the extra leeway I mentioned earlier.


 Stitch 1/4" seam.


 Press away from the red. 


 Repeat with the B triangle on the other end of the row. Press.


If you'd like to neaten things up a bit, trim off those little wings, even with the bottom of the red square.

 To add the white A triangle in the corner, fold and finger press to mark the center of the red square and the center of the white triangle. I stuck a pin in the red so you could see it.


 Match up the edges and centers and stitch. Press.


 Repeat to stitch each row.
You can see how I pressed each row out from the enter.


 Stitch the rows to each other, matching the centers. There are no seams to match up!


On the back, you can see that I pressed the row seams open for a flatter block. Do what works for you.


Trim the block down to 10-1/2" square. You might be able to see that there are spots where there wasn't much to trim.


All trimmed and ready for the dance!

I'm asking the girls in my hive to make one blue block and one red block that I will alternate in the quilt. I'm planning to finish the quilt for my son Pete and present it to him at his Marine Corps recruit training graduation in December. If he's not too embarrassed by me, maybe his platoon buddies and drill instructor can sign it. I'm tearing up just thinking about it! Edit: See the completed quilt here!


This is really a fantastic block. It goes together quickly and makes a striking quilt. Please let me know if you give it a try. 

Enjoy!

Saturday, February 23, 2013

Really Random

 Pete is home from Nicaragua! His team had a fantastic time- everything we had hoped and more. He really didn't want to bother with a camera, but I convinced him at the last minute to pick up a disposable one. This is the best of his 24 shots. Spectacular!


 A man working at the hostel in Leon made this knotted necklace for me and wire rings for Julia. Pete really enjoyed talking to him as he worked.


 On Friday, I had the pleasure of taking a class with Cindy Needham. If you are not familiar with her work, spend some time browsing her website. Her work is absolutely stunning! Stay tuned for more on my project using my grandmother's linens.


I couldn't resist the colors of this grocery store bouquet. Check out the fluffy green thing in the front. It is a Green Trick Dianthus. Who knew?


This zig zag row will be shipped out to the February Modern Stash queen bee.


 I'm going to try to play along with Karen's BOM on Sew Many Ways. I don't have a great track record with BOM's, so we'll see how far I get.

I figure if I make them in the same fabrics that I started using for Jackie's BOM last year, I can combine them at the end. Of course, they are different sizes, so that will just add to the challenge of putting them together.


 It's time to start thinking ahead to our guild retreat next weekend. I can't wait!

Friday, February 22, 2013

Welcome, Olivia!

 My fourth grand-niece was born last week. Isn't Olivia so sweet?


Olivia's baby quilt is now ready to go. I used a really sweet jelly roll (Birdie by Me and My Sister Designs for Moda), Kona white and the Whirlygig pattern by Amelie Scott Designs. The quilt measured 48" x 60" before washing, about 45" x 57" after.


I've seen a quilting pattern similar to this a bunch of times online, so I drew it out on paper before I started. I wanted a loose design, so I started out really big. As you can see, I tightened up significantly as I made my way around the quilt.


See the tiny flowers in the center and giant flowers at the edge?

I used one extra block and some extra strips to make the back wide enough.

 More jelly roll strips became the binding.  I bordered the label with some leftover binding.


I had saved all the lighter strips for the binding, and I thought they needed some help. I think the bright pink ric rac did the trick.


This week was big sister Abby's 2nd birthday. She loves playing in her toy kitchen, so I made her a cute new apron.

Giant dots on the front, tiny dots on the back. I followed this tutorial by Yards and Yards.

I'll be linking up with Crazy Mom Quilts' Finish it up Friday and Pat Sloan's Show & Tell.


Thursday, February 21, 2013

X-Quisite

In 2003 or 2004, I saw Anita Grossman Solomon on Simply Quilts. I immediately went out and bought her book Make It Simpler Paper Piecing.  I'm not exaggerating when I tell you her techniques in that book changed my (quilting) life!

I rarely make a quilt exactly as it appears in a book. When I saw Hugs & Kisses by Marcella Peek in Anita's book, I couldn't wait to get started. The block is called X-quisite. The little squares finish at 2", but in Anita's world, you paper-piece a 6" 9-patch. (I know that won't make sense if you haven't seen it, so go check out this video.) She's a genius!
 

I had a small collection of reproduction 40's prints and just enough white on hand for the background. I changed the applique just a bit, adding the butterflies and smaller flowers, but you can see it is basically the same quilt, all the way to the scrappy binding. I'm guessing this quilt was finished in early 2004. (No label. Shame on me.)


When I finally took down the Christmas wall hanging from the kitchen wall, I put up this little beauty. It brightens up the room and makes me smile!  Every time I see Anita on TV or on the web, I learn something new. I'm now enrolled in her Craftsy class and I can't wait to get started on a new Anita quilt!

Wednesday, February 20, 2013

WIP Wednesday

 There hasn't been much sewing going on around here lately. It's all about the cookies for a few more weeks. My much-loved Bernina 153 was making a horrible squeaking noise. She spent a few days at the spa and is good as new and purring like a kitten again.

Finished: (well, sort of...) I finished the top and pieced the back of our guild raffle quilt. It was delivered to our resident machine quilter last Thursday.


 In Progress: Baby quilt for grandniece Olivia who was born on the 13th. The top was done before she was born, but I just couldn't risk quilting it with that nasty squeak. I'm planning to make an apron for big sister, Abby. Her 2nd birthday was yesterday. They may as well learn young that Aunt Tina's gifts are always late!


 In other news: Pete is currently on a school trip to Nicaragua! Bill and I are practicing empty-nesting and we are loving it. We can't wait to hear Pete's stories from this trip, but in the meantime we are enjoying a house that stays clean and food that doesn't instantly disappear from the pantry.


The snow has been beautiful, but winter is getting old. They tell me Spring is coming!


 Be sure to check out all the lovely quilt projects at Freshly Pieced. 

WIP Wednesday at Freshly Pieced
 
I'm heading back to the baby quilt.

Sunday, February 10, 2013

Snow Day / Sew Day

 Winter Storm Blizzard Nemo was here! We are very lucky to have electricity and heat. My mom is safe, too. Her building almost never loses power.

I shoveled the path from the front door to the driveway and the men of the house took care of the rest. We ended up with about 18" of snow, which doesn't compare with some areas with well over 2 feet. The worst part was the wind. Heavy wet snow plus wind = downed branches that take out power lines. It could be another day or more before all the power is restored. Did I mention how lucky we are?


What is a quilter to do being snowed in for a few days? I finished the baby quilt top for my niece. It is pinned to this quilt on my kitchen wall and you can see it shadowing through. Baby quilts always look great on this green wall!


When I cut up the jelly roll for these blocks, I was left with one 2.5" square of each strip. I pieced these little 4-patches as leaders/enders while piecing the blocks and quilt top. A few triangles to fill in the sides and I'll have a sweet little Spring table topper.


Today will be sunny and a little warmer. We're praying that our friends will have power restored soon.